MULTIPLE PERSONALITIES
Tutorial by BayuIdea
FINAL
STEP 1
Open your image...
STEP 2
Make a new layer above baground
then use the brush tool with a white circle
STEP 3
Then make a new layer above the image layer that will be edited
use a brush to give effect to crack cracks
STEP 4
Then fill the face by using the tool Brun TOOL
STEP 5
copy of eye image, with the selection and press ctrl + J, then played his color
by using the hue / saturation.
STEP 6
Then use the brush smoke
FINAL IMAGE
Minggu, 05 Desember 2010
MULTIPLE PERSONALITIES
Label: fantasy tutorial, photoshop cs 3, Photoshop Tutorial
Diposting oleh Bayu Idea di 06.47 0 komentar
Sabtu, 14 Agustus 2010
PHOTO MANIPULATION GOTHIC SERIES
FINAL IMAGE
1.Open an image that will be edited
Open gambar yang akan di edit
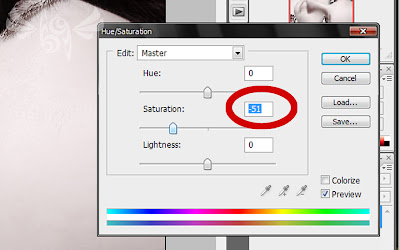
2. Click ctrl + H, to set the Hue / Saturation
Klik ctrl+H, untuk mengatur Hue/Saturation
3. Then duplicate the layer, press ctrl + J
Lalu duplicate layer, tekan ctrl+J
4. Then use the Brush Tool, with Brush Crack_decay_peel_brush_sampler_by_FrozenStarRo
Kemudian gunakan Brush Tool, dengan Brush Crack_decay_peel_brush_sampler_by_FrozenStarRo
5. Then click the Filter + Redfield + Fractalius, to use the plug-ins fractalius, download it first.
Lalu klik Filter+Redfield+Fractalius, untuk menggunakan plug-in fractalius, download terlebih dahulu.

6. Remove part fractalius excessive or not in need.
Hapus bagian fractalius yang berlebihan atau tidak di perlukan.
7. Then combine the layers, right click + Marge down.
Kemudian gabungkan layer, klik kanan + marge down.
8. Use the Burn Tool, use the parts in desired.
Gunakan Burn Tool, gunakan di bagian yang di inginkan.
9. Then click the image + adjustment + brignes / contras, set as desired.
Lalu klik image+adjustment+brignes/contras, atur sesuai keinginan.
FINAL IMAGE

Label: gothic, Graphics Design, tutorial photoshop, tutorial photoshop by bayu idea
Diposting oleh Bayu Idea di 05.12 0 komentar
Minggu, 30 Mei 2010
Photo Manipulation make the world in the grip of by BayuIdea
I made this image based on the original photo I was looking on google, by turning it into this kind may become more attractive.
And I made a short tutorial for you lovers of design, especially for those of you a beginner.
Good luck.
Final Image
Step 1
Open an image that will be edited.
Buka gambar yang akan di edit.
Step 2
Make a new layer, then use the Elliptical Marque Tool, For making a circle.
Then give the white color, then remove the center circle.
Buatlah layer baru, lalu gunakan Elliptical Marque Tool, Untuk membuat lingkaran.
Lalu beri warna putih, setelah itu hapus bagian tengah lingkaran.

Step 3
Then input new images, Delete parts of the excessive,
Put in the middle of the middle circle we have made previously.
Lalu masukan gambar tambahan, Hapus bagian yang berlebihan,
Letakan di tengah tengah lingkaranyang telah kita buat sebelumnya.
Step 4
additional images next input, then replace the normal screen.
masukan gambar tambahan berikutnya, lalu normal di ganti screen.

Final Image
Label: belajar photoshop, edit foto, Graphics Tutorial, photo edit, photography, Photoshop, Photoshop Tutorial, tutorial photoshop, tutorial photoshop by bayu idea
Diposting oleh Bayu Idea di 07.29 0 komentar
Making of Broken Glass Eye By BayuIdea
I made this image based on the original photo I was looking on google, by turning it into this kind may become more attractive.
And I made a short tutorial for you lovers of design, especially for those of you a beginner.
Good luck.
Final Image
Step 1
First of all open images to be edited,
then create a new layer and use a brush-Broken Glass, by using the color white.
and remove the excess brush.
Pertama tama buka gambar yang akan di edit,
lalu buat layer baru dan gunakan brush Broken-Glass, dengan menggunakan warna putih.
dan hapus bagian brush yang berlebihan.

Step 2
back to bageround, use the tool (Dodge tool),
to illuminate the facades that are in the circle of glass eyes
kembali ke bageround, gunakan tool ( Dodge tool ),
untuk menerangi bagian muka yang berada dalam lingkaran kaca mata.
Step 3
Enter Figure broken glass, then replaced with a screen to normal.
Masukan Gambar kaca pecah,Lalu normal di ganti dengan screen.

Step 4
Finally, a new layer above Make bageround image, use the brush Blood.
Terakhir, Buatlah layer baru di atas gambar bageround, gunakan brush Darah.
Final Image
Label: belajar photoshop, edit foto, photo edit, photography, Photoshop, Photoshop Tutorial, tutorial cs3, tutorial photoshop, tutorial tutorial
Diposting oleh Bayu Idea di 06.53 0 komentar
Jumat, 28 Mei 2010
Make The Background in Full Color Photoshop by BayuIdea
Make The Background in Full Color Photoshop
Final Image
Step 1
Make a new sheet, with the color black baground.
Then use the marquee tool Reqtangular tool.
Then in the given color to your liking.
Buatlah lembar baru, dengan warna baground hitam.
Lalu gunakan tool Reqtangular marquee tool.
Lalu di beri warna sesuai dengan keinginan anda.


Step 2
After so, duplicate the layer and click ctrl + t,
then remove the bottom and reduce its opacity in accordance with the tutorial.
Setelah jadi, duplikat layer tersebut dan klik ctrl + t,
lalu hapus bagian bawah dan kurangi opacity nya sesuai dengan tutorial.

Step 3
Make the text, according to your liking, then right click select blending option,
and set customized to your liking.
Buatlah teks, sesuai keinginan anda, lalu klik kanan pilih blending option,
dan atur sesuaikan dengan keinginan anda.


Step 4
In a color image layer, right click and select blanding option, set match with the tutorial.
Pada layer gambar warna klik kanan dan pilih blanding option, atur sesuaikan dengan tutorial.


Step 5
Use a round brush, and select white, then cut into two and the top of the line behind the tutorial.
Gunakan brush bulat, dan pilih warna putih, lalu potong menjadi 2 dan bagian atas di balik sesuai tutorial.


Step 6
make the next image using polygonal Lasso tool.
buatlah gambar berikutnya dengan menggunakan Polygonal lasso tool.


Final Image
Diposting oleh Bayu Idea di 07.06 0 komentar


