I made this tutorial just to share to you all, and let the same as learning.
Final Image
Step 1
Open the picture you want in the edit
Buka gambar yang akan di edit
Step 2
Baground copy (ctrl + J)
and turn the image as in the tutorial (ctrl + T)
Step 3
After the play, select Filter - Blur - Motion Blur. Follow the settings as in the tutorial.
Setelah di putar, pilih Filter - Blur - Motion Blur. Ikuti pengaturan seperti pada tutorial.
Step 4
The next step change Normal to Screen. Then set the contras image, Select Image - Adjustment - Brignes / Contrast
Langkah selanjutnya ubah Normal menjadi Screen. Lalu atur contras gambar, Pilih Image - Adjustment - Brignes/Contarst
Step 5
Make a new layer with black, then Select Filter - Render - Lens Flare ... follow the settings such as tutorials, to get light.
Remove sections that are not in need, just take a round light. put on this part of the headlights.
Copy this and put a light layer on the lamp light satunya.Lalu combine into a single layer.
Buatlah layer baru dengan warna hitam, Lalu Pilih Filter - Render - Lens flare...iKuti pengaturan seperti tutorial, untuk mendapatkan cahaya.
Hapus bagian yang tidak di perlukan, ambil cahaya bulatnya saja. letakan pada bagaian lampu mobil.
Copy layer cahaya tadi dan letakan pada lampu yang satunya.Lalu gabungkan layer cahaya menjadi satu.


Step 6
After the light had incorporated a copy layer and select Filter - Blur - Motion Blur, Follow the settings as in the tutorial.
Change normal to be Green. And delete the part that is not important.
Setelah tergabung copy layer cahaya tadi,lalu pilih Filter - Blur - Motion Blur, Ikuti pengaturan seperti pada tutorial.
Ubah normal menjadi creen. Dan hapus bagian yang tidak penting.
Step 7
Combine all the layers ... right click on bageround, select the layer visible.
Then set contrast, Select Image - Adjustment - Brignes / Contrast.
Gabungkan semua layer...klik kanan pada bageround, pilih layer visible.
Lalu atur contrasnya, Pilih Image - Adjustment - Brignes/Contrast.

Step 8
Make a new layer with black color, then select Filter - Render - Clouds Defference.
Change Normal to Color Dodge.
Buatlah layer baru dengan warna hitam, lalu pilih Filter - Render - Defference Clouds.
Ubah normal menjadi color dodge.
Final Image
Selasa, 18 Mei 2010
Makes the car shine by BayuIdea
Selasa, 11 Mei 2010
MAKE YOUR OWN WALPAPER by BayuIdea
For this tutorial I made just to share to you all, I hope you liked my work.
Final Image
STEP 1
Create a new file, click the fie-new, set the paper size as below.
(Buat file baru, klik fie-new, atur ukuran kertas seperti di bawah ini).
STEP 2
Use the Gradient tool, with a color according to your wishes.
(Gunakan Gradient tool, dengan warna sesuai kemauan anda).


STEP 3
Copy the layer and choose filter - render - differnce cloud, change the Normal to Color dodge.
(Copy layer dan pilih filter - render - differnce cloud, ubah Normal menjadi Color dodge).
STEP 4
Make the text that you want to do, Change text to normal on csreen.
(Buatlah teks yang anda ingin kan, Ubah normal pada teks menjadi csreen).
Final Image

MAKE HUMAN ROBOT by BayuIdea
For this tutorial I made just to share to you all, I hope you liked my work.
Final Image
STEP 1
Open the picture you want in the design.
(Buka gambar yang anda inginkan dalam desain).
STEP 2
create new layer.
(membuat layer baru).
STEP 3
Use SS-cracks brushes, download brushes, glue on the section you want in the design.
(Gunakan brush ss-craks, download brush, tempelkan pada bagian yang anda inginkan dalam desain).

STEP 4
Remove the middle to put the additional images.
(Hapus bagian tengah, untuk menaruh gambar tambahan).
STEP 5
Enter the additional image is an image machine.
(Masukan gambar tambahan berupa gambar mesin).
STEP 6
Remove the excessive images.
(Hapus gambar yang berlebihan).
STEP 7
Remove the edges in accordance with the pattern of cracks that we have made.
(Hapus bagian pinggir sesuai dengan pola retakan yang telah kita buat).
STEP 8
Next to the edge of the image, use the tool to give effect Brun image or go deeper.
(Selanjutnya untuk bagian pinggir gambar, gunakan Brun Tool untuk memberikan efek gambar lebih kedalam atau masuk).
Final Image
Make the keyboard to fire by BayuIdea
I made this tutorial is purely just to share knowledge to design connoisseurs of design.
Final Image
STEP 1
Open the picture you want us to edit.
(Buka gambar yang akan kita edit).
STEP 2
Download images of fire, for the additional images in these edits.
Real Change in the image into a screen.
(Download gambar api, untuk menjadi gambar tambahan dalam pengeditan ini,ubah Normal pada gambar menjadi screen).
STEP 3
Customize the color of the object, click CTR + U, follow the settings above.
(Sesuaikan warna objek, klik Ctr + U, ikutin pengaturan di atas).
STEP 4
Adjust the contrast on the image of fire, select Image-Adjustements-Brighteness/Contrast, adjust the settings above.
(Atur contrast pada gambar api, pilih Image-Adjustements-Brighteness/Contrast, sesuaikan dengan pengaturan di atas).
Final Image
TUTORIAL GRAPHIC DESIGN WITH ADOBE PHOTOSHOP BEAUTIFUL TEXT by BayuIdea
I made this tutorial, just purely to share the knowledge to design lovers, I hope this tutorial can help you in learning design.
Final Image


STEP 1
Open a new file, click open - new
And set as above.(Buka file baru, klik open - new, Dan atur seperti di atas).
STEP 2
Make a new layer, and colored black.(Buatlah layer baru, dan bewarna hitam).
STEP 3
Then, use the pen tool (p), and shape as above.(Lalu, gunakan pen tool (p), dan bentuk seperti di atas).
STEP 4

Then click phats, right click select stroke phats, and the result will be like this.
(Kemudian klik phats, klik kanan pilih stroke phats, dan hasilnya akan seperti ini).
STEP 5
The next step, copy the new layer we created earlier, and the modification itself into the shape you want.
by using Ctrl + T, to rotate the image according to the position you desire.
(Langkah selanjutnya, copy layer yang baru kita buat tadi, dan modifikasi sendiri menjadi bentuk yang anda inginkan. dengan menggunakan Ctrl + T ,
untuk memutar gambar sesuai posisi keinginan anda).
STEP 6


After that, do not forget to incorporate the layer layers line that we make, having joined then we copy the layer,
after the copy, its bottom layer at the click, then select Filter-Blur-Blur Grausian.
Then after the blur, Merge between the layers, which are in the same blur and layer on top.
(Setelah itu, jangan lupa menggabungkan layer layer garis yang kita buat,
setelah tergabung barulah kita mengcopy layer tersebut, setelah di copy,
layer bawah nya di klik, lalu pilih Filter-Blur-Grausian Blur.
Lalu setelah di blur, Gabungkan antara layer yang di blur dan layer yang sama di atasnya).
STEP 7

Paint the results we have made earlier, using a round brush, with color according to your wishes,
make a new layer before coloring, and if it has been filled with color, change the Normal to Overlay.
It will obtain the results as above.
(Warnai hasil yang telah kita buat tadi, dengan menggunakan brush bulat,
dengan warna sesuai keinginan anda, buatlah layer baru sebelum mewarnai,
lalu jika telah penuh dengan warna, ubah Normal menjadi Overlay.
Maka akan di dapatkan hasil seperti di atas).
STEP 8


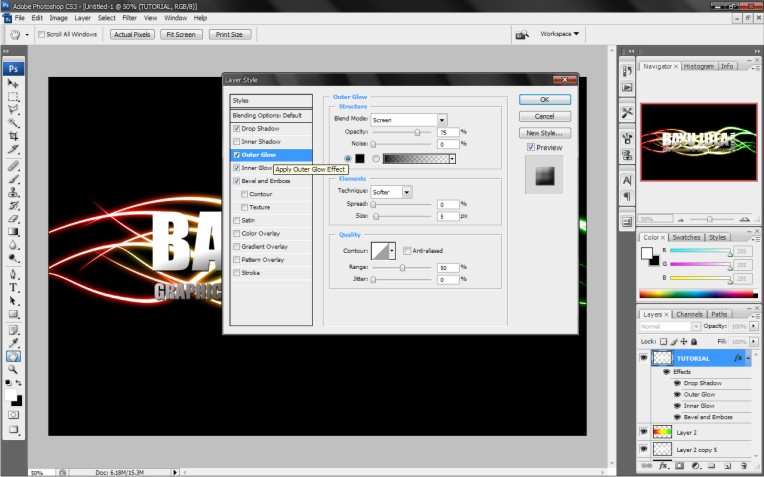


Next create a text using blanding effects option, follow the rules above.
(Selanjutnya membuat teks dengan menggunakan efek blanding option, ikutin aturan di atas).
STEP 9
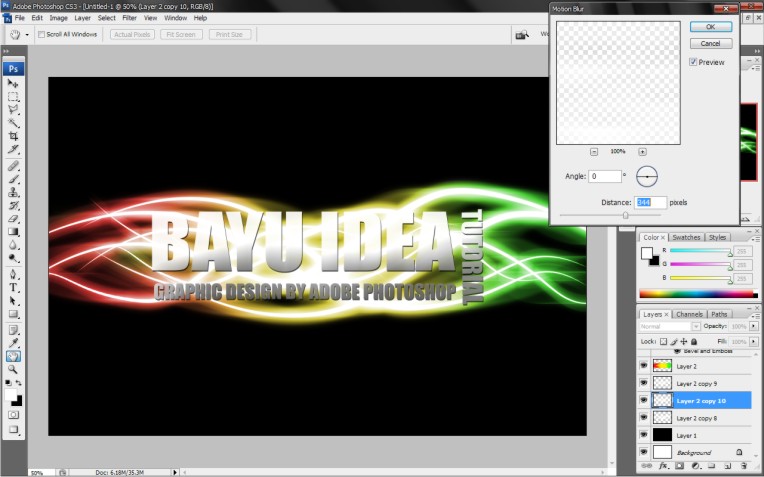
Copy layer spiral line we have made earlier, into three layers.
The top layer in Motion blur give effect, click the Filter-Blur-Motion Blur,
follow the settings as above, and the layer beneath the same, except the last layer spiral.
(Copy layer garis spiral yang telah kita buat tadi, menjadi tiga layer.
Layer paling atas di berikan efek Motion blur, klik Filter-Blur-Motion blur,
ikuti pengaturan seperti diatas, dan layer bawahnya sama, kecuali layer spiral terakhir).
STEP 10
Finally, combine all the layers, right click and select Marge visible.
(Terakhir, gabungkan semua layer, klik kanan dan pilih Marge visible).
Final Image